
CNtoU JMount – 07 is an adjustable mobile antenna bracket for JPC-7 and JPC-12 antennas.It offers flexible orientation adjustments, allowing the antenna to be positioned vertically or horizontally. This makes it ideal for installations in limited spaces, such as apartment balconies. The bracket ensures effective HF antenna deployment while maintaining a compact profile.
Product Overview
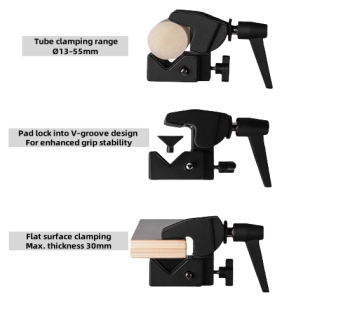
The CNtoU JMount-07 offers dual mounting configurations:
- Tube Surface Mount
- Flat Surface Mount
Refer to the diagram for detailed specifications and installation guidelines.
The CNtoU JMount-07 features an integrated clip at its base, designed for seamless compatibility with the JPC-7 base. Refer to the diagram for precise alignment and installation details.

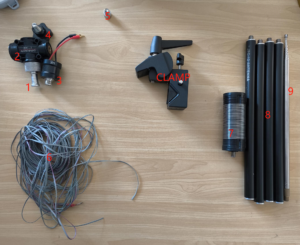
Requirements Checklist (Reference Template)
Note: The items below are suggested guidelines. Adapt, modify, or expand based on your specific product specs, or needs.
1 – TRIPOD ADAPTOR
2 – V BASE
3 – 1:1 BALUN
4 – M10 SCREW
5 is also a M10 bolt (4 and 5 are alternative, they do the same work, if you already own a 4/5 then you don’t need the other)
6 is radials from the JPC-12 vertical antenna kit;
7 – coil
8 – four antenna arms
9 – 2.5 meter telescopic whip
How to Installation JMount-07 with JPC-7 OR JPC-12
Option 1: Vertical Installation
1. Prepare a flat installation surface.
2. Install the clip accessory suitable for the flat surface onto the clip part of the main bracket.
3. Place the bracket with the installed accessory on the selected flat surface, and gently turn the bracket to confirm its stability.
4. Install the antenna arm of the JPC-7 and JPC-12 antenna upwards on the bracket.
5. Install the radials on either side of the antenna.
6. After completing the installation, you can start the operation.
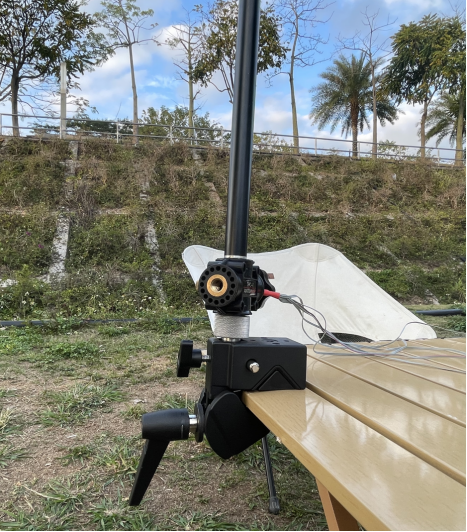
Option 2: Horizontal Installation (Taking the Balcony Rail as an Example)
- Confirm that the balcony rail is a circular surface, and remove the accessory suitable for non-circular surfaces from the bracket.
- Align the clip of the main bracket with the balcony rail, put the JPC-7 and JPC-12 antenna into the clip and tighten it.
- Install the bracket on the rail and fix it firmly.
- Connect the coaxial cable to complete the installation.
Usage Precautions
- When adjusting the opening size of the clip of the bracket, please operate moderately to avoid damaging the bracket due to excessive force.
- Since additional components may be required for a complete setup, please prepare the required radio and antenna arms in advance to ensure the smooth installation and use of the antenna.

Conclusion
We hope this guide has provided clear instructions for installing and using the CNtoU JMount-07.For an intuitive look at the detailed operation steps of the product, click on the video link below, where we will demonstrate everything for you.
You can learn more details at https://youtu.be/rf24JjeHXdg?si=6oTxHpili6xUAkC3 .
If you encounter any issues, please contact our support team at support@chelegance.com. We’re committed to ensuring you get the best performance from your antenna setup and enjoy the full benefits of this product.